Welcome to Plannie
The app that takes the hassle out of all-things-scheduling
Built for client-facing businesses, Plannie simplifies appointment coordination.
Plannie frees business owners’ time and energy, so you can focus on what matters most:
attracting more clients, offering better service and growing your business.
What types of businesses? Any business, and especially client-facing service providers. Whether you’re a gym trainer, therapist, tutor or library manager - Plannie is fit for you.
The best bit? All you need is your smartphone. From there, it’s a few quick clicks, and presto - an intuitive, user-friendly experience is available to both business owners and their clients.
The User’s Guide to Plannie
Let's Get to Work
How to begin? Once you sign up to Plannie, you will have to create custom availability templates and design your workweek.
Simple. Streamlined. Sweet.
How to set custom availability?
- Click the main menu on the left-hand corner (3 stacked lines) and click ‘week.’
- Click the + sign.
- Set your custom availability:
- Choose a label for your custom availability.
For example, “full-day,” half-day,” “clinic time,” “WFH,” “face-to-face,” “independent work.” Whatever suits you.
Don’t worry: labels are only visible to you – your clients won’t see them.
Choose useful and clear labels to help you manage your schedule. - In the “Duration” field, set the number of hours for the custom availability. You can decide to have a break between appointments and set its duration.
- Define which services you will offer in custom availability.
- Choose a label for your custom availability.
- Click the “Create” button at the top of the screen. Congratulations! You have successfully created your first custom availability.
- Want to create more custom availabilities? Simply repeat stages 1-4 for each custom availability you’d like to add.
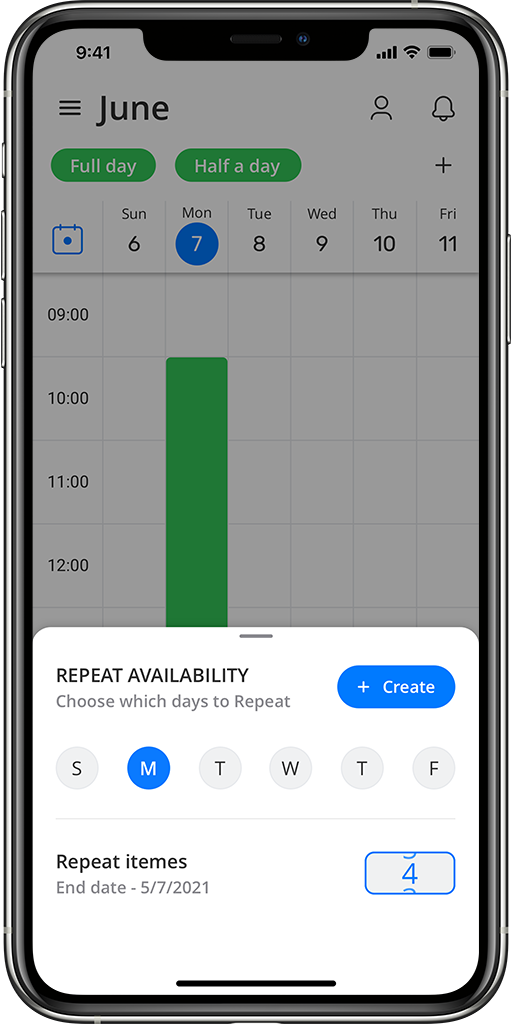
- Once your custom availability is successfully created, simply click its label at the top and drag it onto the designated day and time on your calendar. Once placed on a specific date, note the pop-up that asks you to define whether this is a repeat availability. You can easily duplicate it to additional days of the week. The maximum number of repetitions is 12, so you can plan custom availabilities for about 3 months in advance.
- Click ‘open availability’ to enable scheduling.
- Well done! Your calendar is all set and ready to be shared with your clients.
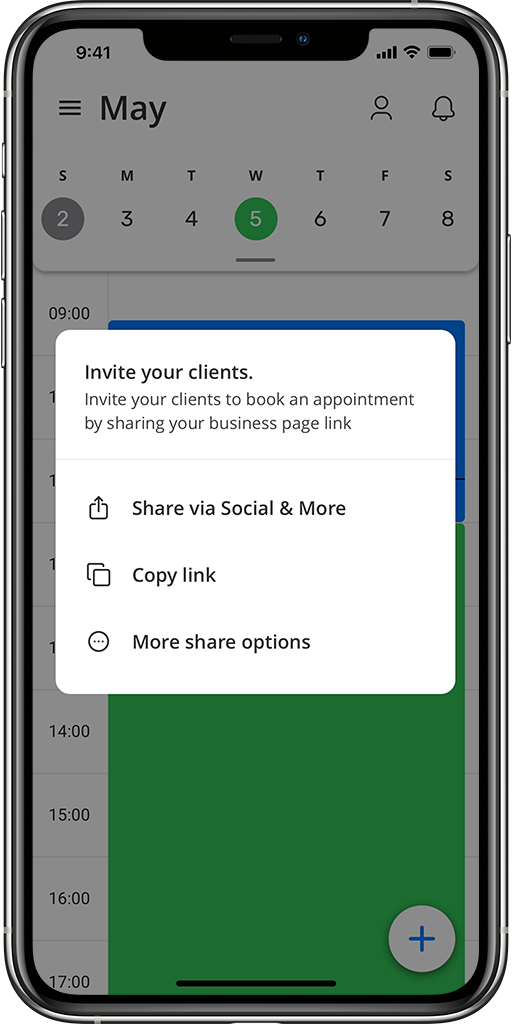
How to share your calendar with clients?
- After creating your calendar, click the ‘+’ button that appears on the lower-left side of the screen.
- Click ‘Share availability.’
- Select your preferred sharing channel.
- You will get an automated text message whenever a client schedules an appointment.
You can easily copy your calendar link from the top of the app menu. Add it to your social profiles, website, your messaging app auto-responder, or anytime you interact with a customer about scheduling. It’s the best way to showcase your services and available times.
How to send appointment reminders to clients?
Plannie automates text notifications, so your clients will get text reminders before every appointment. To customize your automated text messages open the main menu (3 stacked lines), click Settings, and select Client text messages.
Let’s see how this works:
- Once a client schedules an appointment via your business page (s)he will immediately and automatically receive a text notification that includes the appointment time and the service requested.
- You can customize additional text, so the reminder will also include your address, telephone number, and any other essential details.
For example, if you’re a pedicurist, you may want to remind your client to bring flip-flops, and if you’re a gym trainer, this is your space to ask to bring a water bottle and a towel. - According to your preference, the client will also receive a reminder on the scheduled day or the day before.
- In case you need to cancel or reschedule the appointment, your client will automatically get a text message with the updated appointment details.
How to customize text reminders to clients?
- Open the main menu (3 stacked lines).
- Click ‘Settings’.
- Click ‘Client text notifications.
- Choose to include address and/or phone number and add your custom message.
How to send a group text message to all of your clients?
Do you have a new service or product to share? Are you planning a vacation? Do you want to offer a special holiday discount? With Plannie you can easily share updates and notifications with all of your clients over text.
- Open the main menu (3 stacked lines).
- Choose Bulk message.
- Select specific clients from your list, or click the ‘Select all’ button, then click the arrow at the bottom right of your screen.
- Enter your custom message, you have up to 201 characters for your message.
- Click ‘Send’
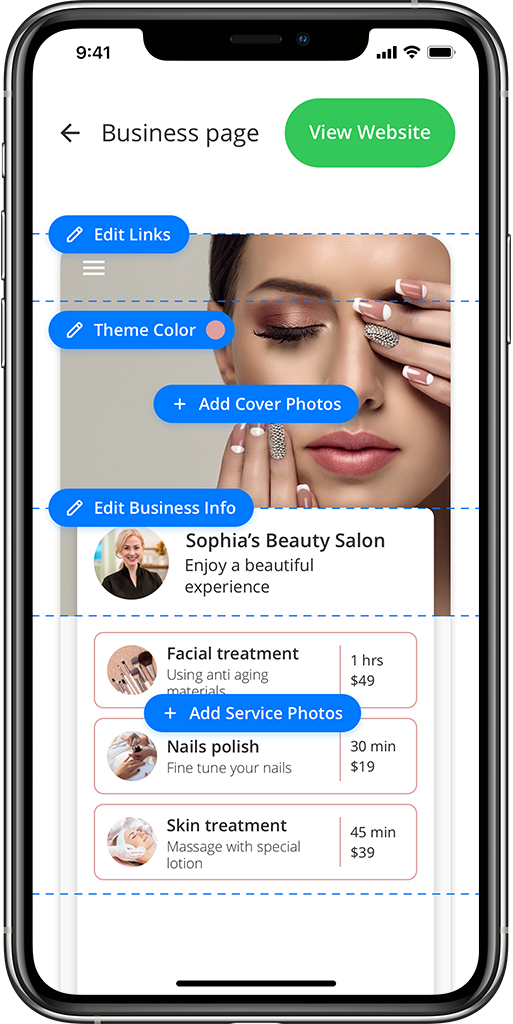
How to customize and edit your business page?
Once you sign up to Plannie, your business page is created. You can custom your business page, so it communicates your brand values, style, and look-and-feel.
Let’s walk through this together:
- Open the main menu (3 stacked lines).
- Click ‘Business Page.’
- Choose a color palette and add rotating images. You can also select a unique image for each service.
- Add links to your Instagram page, your Facebook profile and messenger, your phone number for Whatsapp texting, and your address for navigation.
- You can edit your business information and add text instructions that will appear on your calendar page.
What is the Smart Revenue Maker
Plannie’s Smart Revenue Maker is a collection of features that enable you to effortlessly get more bookings so you can increase your revenues. Check out this guide to learn how to use it.
What is the Smart Revenue Maker?
Plannie’s newly released Smart Revenue Maker is a set of features that does all the heavy lifting for you:
It identifies opportunities to get more bookings,
and communicates with clients with timely and tailored messages.
The result: more booked appointments, increased revenues, and a thriving business.
What are the Smart Revenue features?
- Convert abandoned bookings
Send personalized schedule suggestions to clients who left your business page without booking. - Manage a waiting list
Offer a standby option to instantly book vacancies. - Bring back missed regulars
Re-engage your straying customers with an encouraging text they can’t resist.
We are working on other revenue-generating features… stay tuned for more!
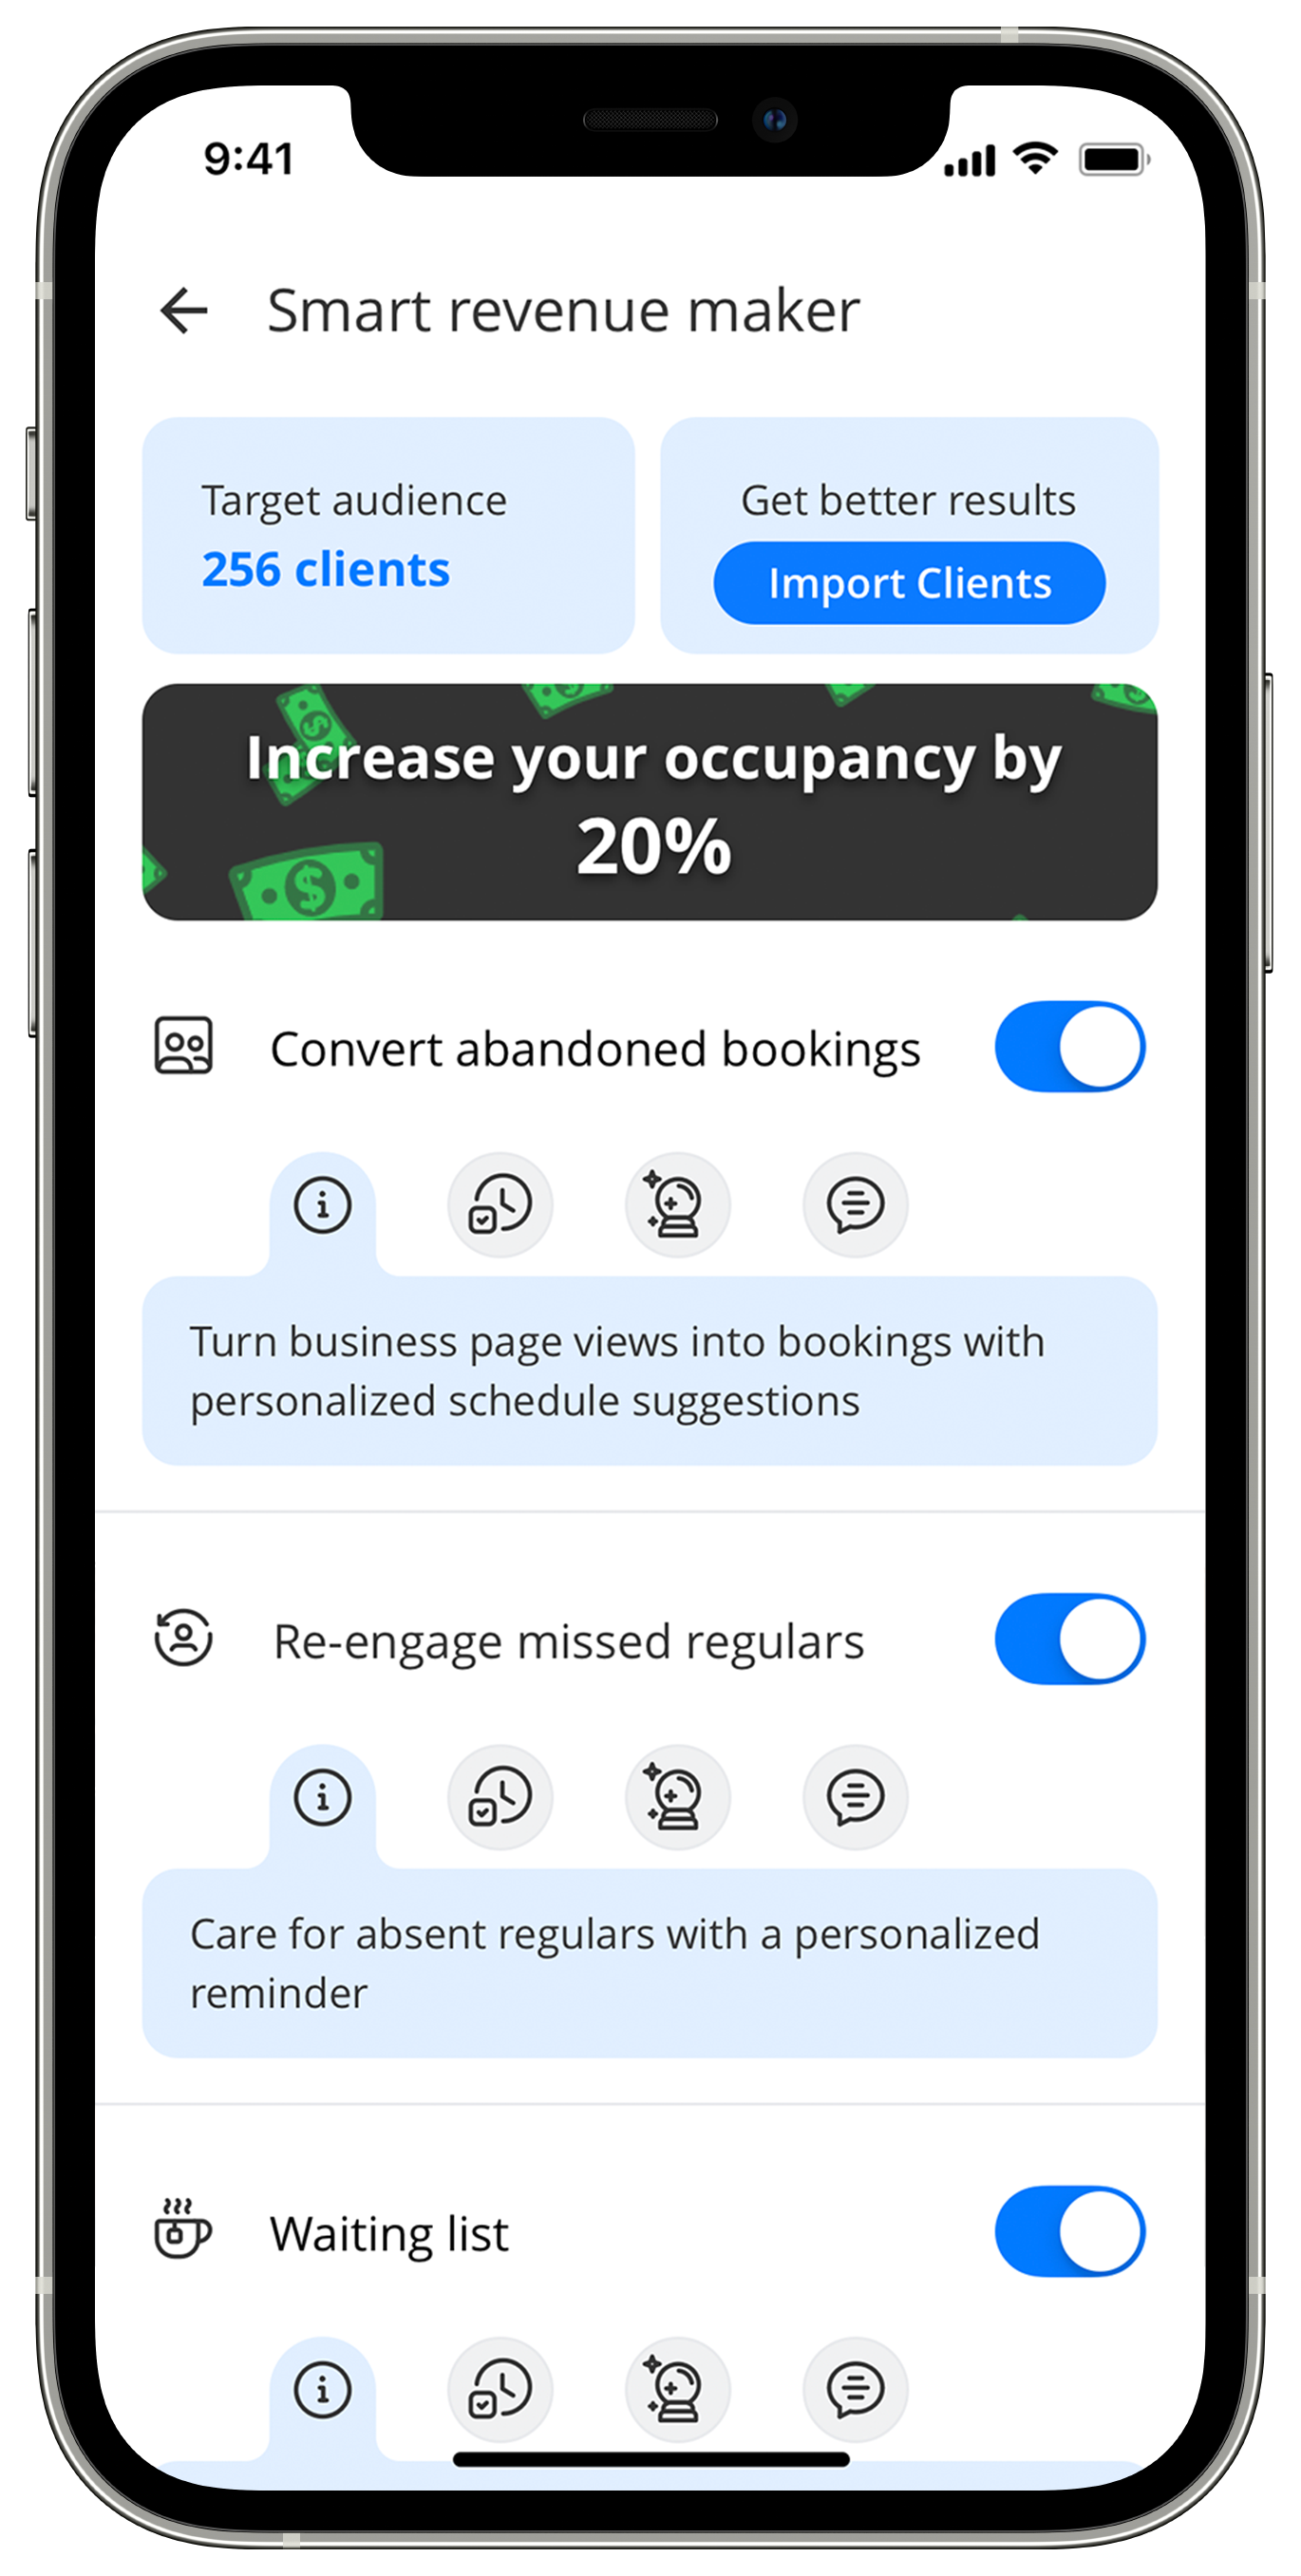
How to enable the Smart Revenue Maker?
- It’s very simple.
- Click the main menu at the top left-hand corner (3 stacked lines).
- Select Smart Revenue Maker.
- Import Clients – create your client list directly from your phone by allowing Plannie access to your contacts.
Plannie’s smart search will sift through your list so only relevant contacts end up in your client list.
A rich and up-to-date client list is essential so you can communicate swiftly with your clients with Plannie. - Enable the Smart Revenue Maker features – toggle right to enable individual features.
You can review the settings, client message, and potential revenue from each one, based on our global stats. - That’s it, you’re all set.
Plannie will automatically communicate with your clients on your behalf, and encourage them to book appointments with relevant suggestions that work for them and you.
? Good to know:
The Smart Revenue Maker is automated – once you enable it, you don’t have to give it a second thought: just focus on your busy business and serve the stream of clients pouring in.
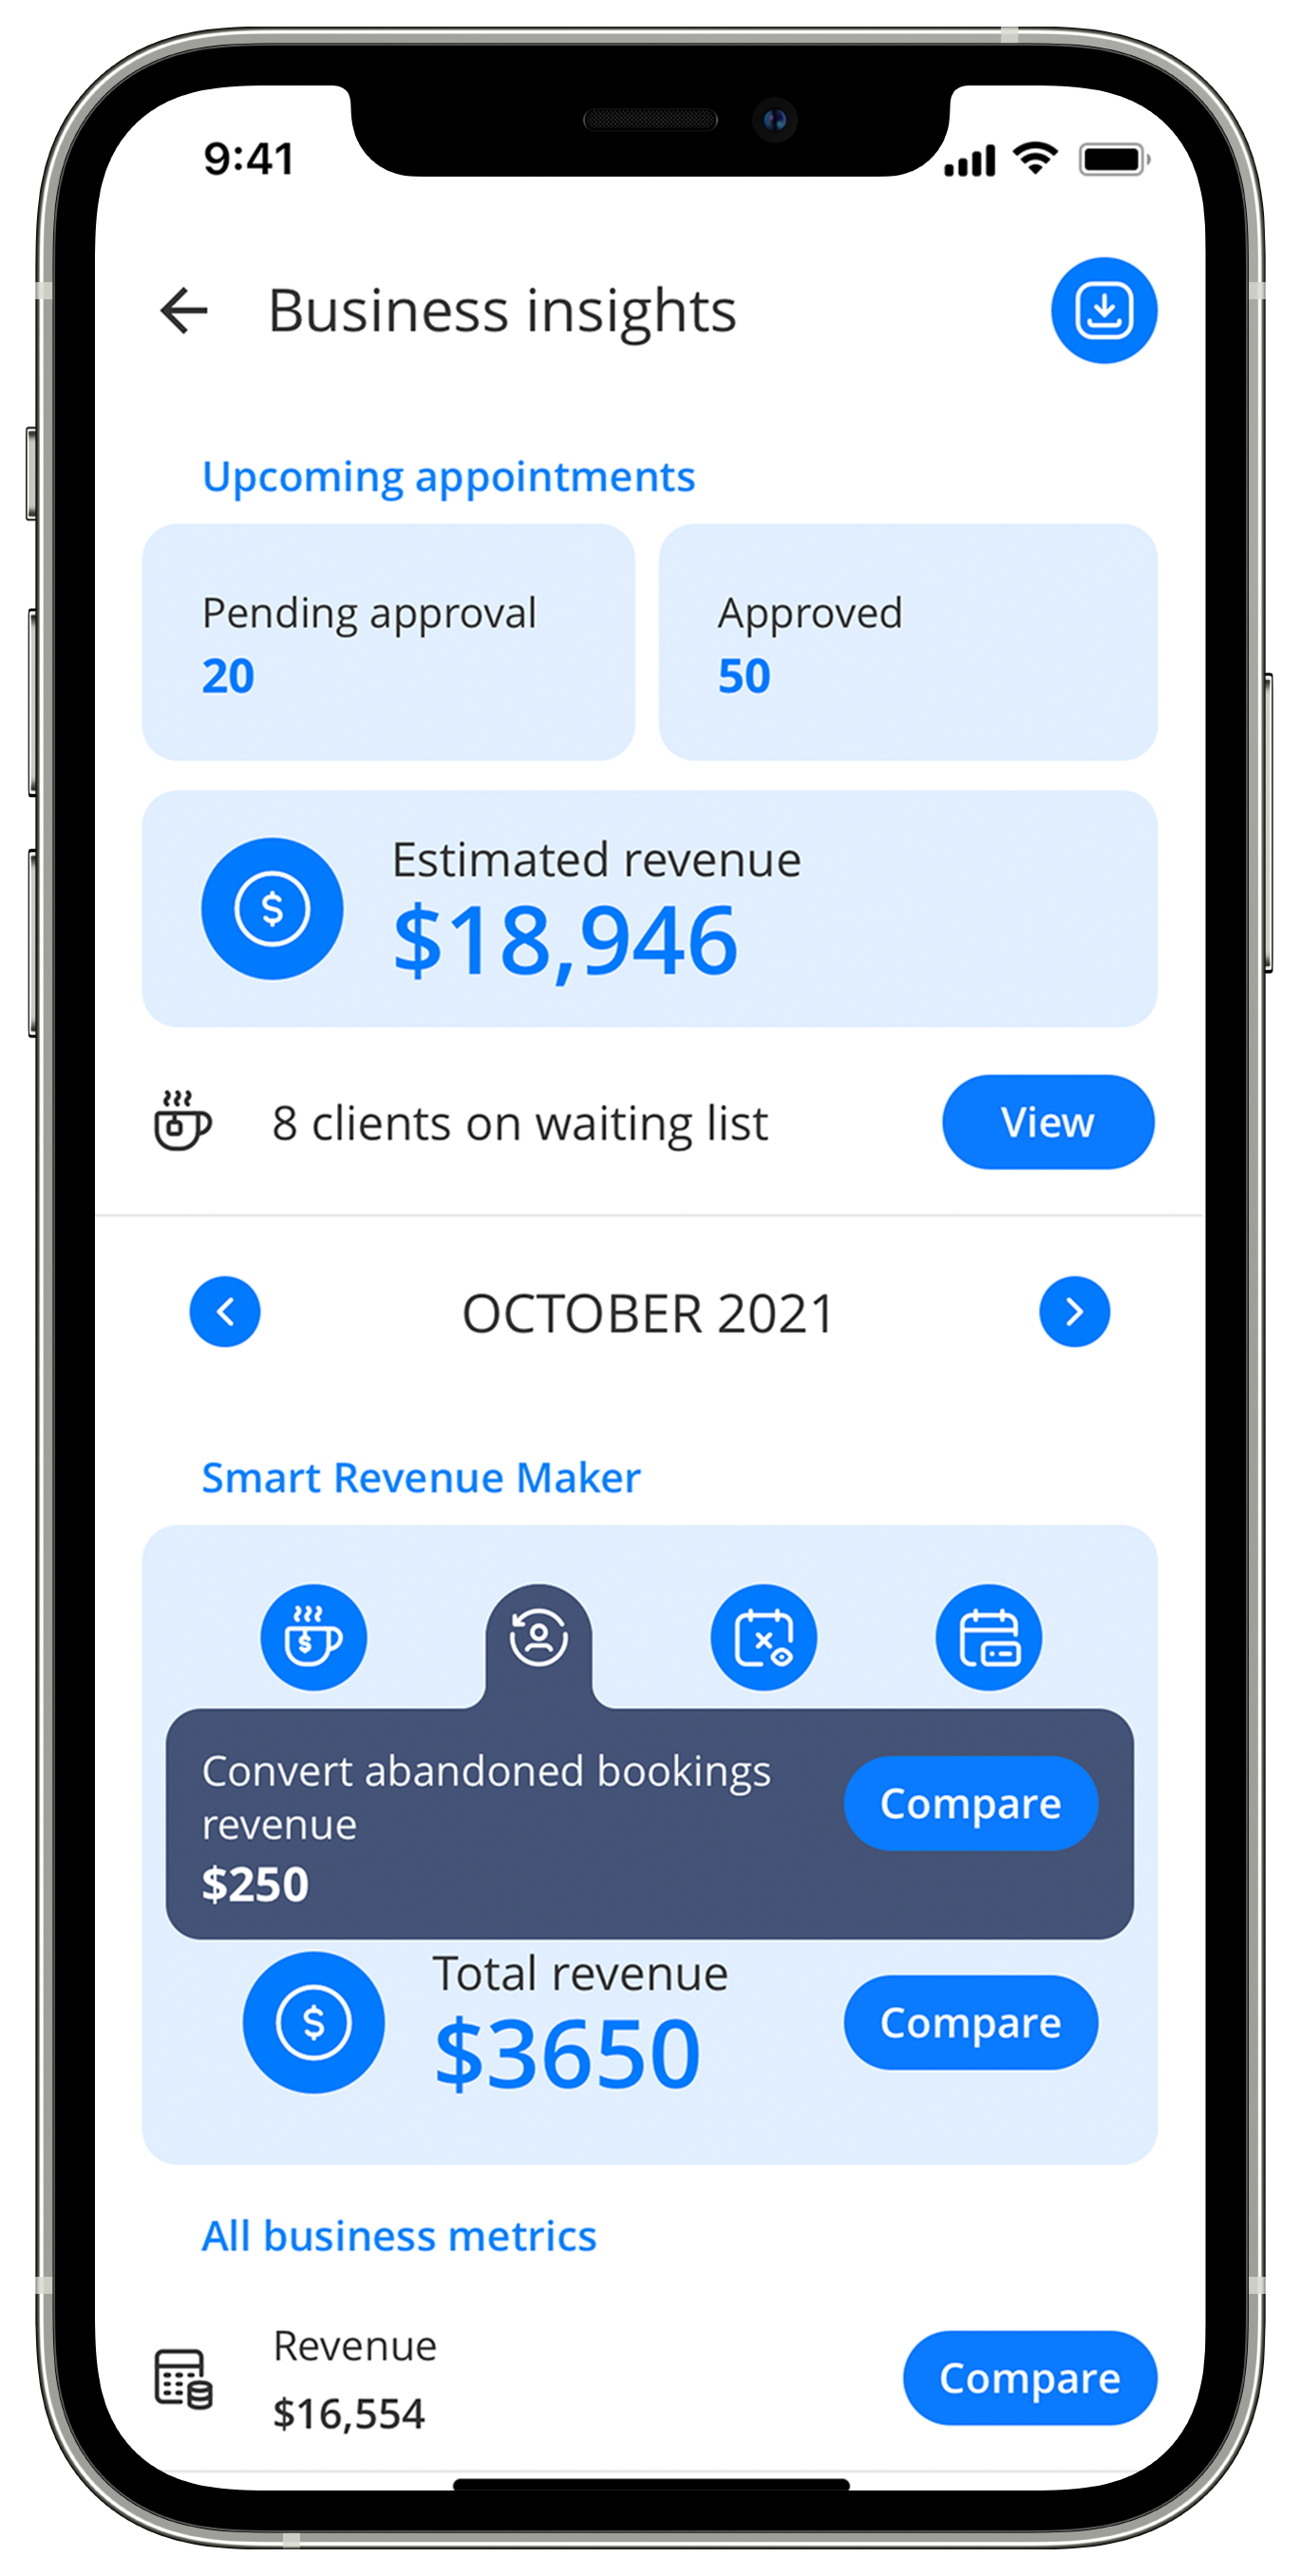
How to gain insights into your business and revenue?
- We believe that you are in control of your success. Success follows action, and action follows information. The Business Insights page gives you all the key information about your business.
Complete data about bookings and revenue is available for you on the Business Insights page:- Click the bulb icon ? at the top right-hand corner of the screen to reach your Business Insights page.
- View all data about revenue and bookings with Plannie, including:
- The number of booked appointments
- Number of business page views
- Revenue earned in booked meetings
- View all data about revenue and bookings specific to the Smart Revenue Maker. Gain insights about each feature’s role in the growth of your business.
- Compare your current performance to past performance – click Compare to track progress and growth.
? Good to know:
Most businesses’ performance fluctuates: some months are busier than others. Keeping track of your numbers over time will help you better prepare for the slower seasons and gain insights for future growth.
Other Tidbits Worth Knowing
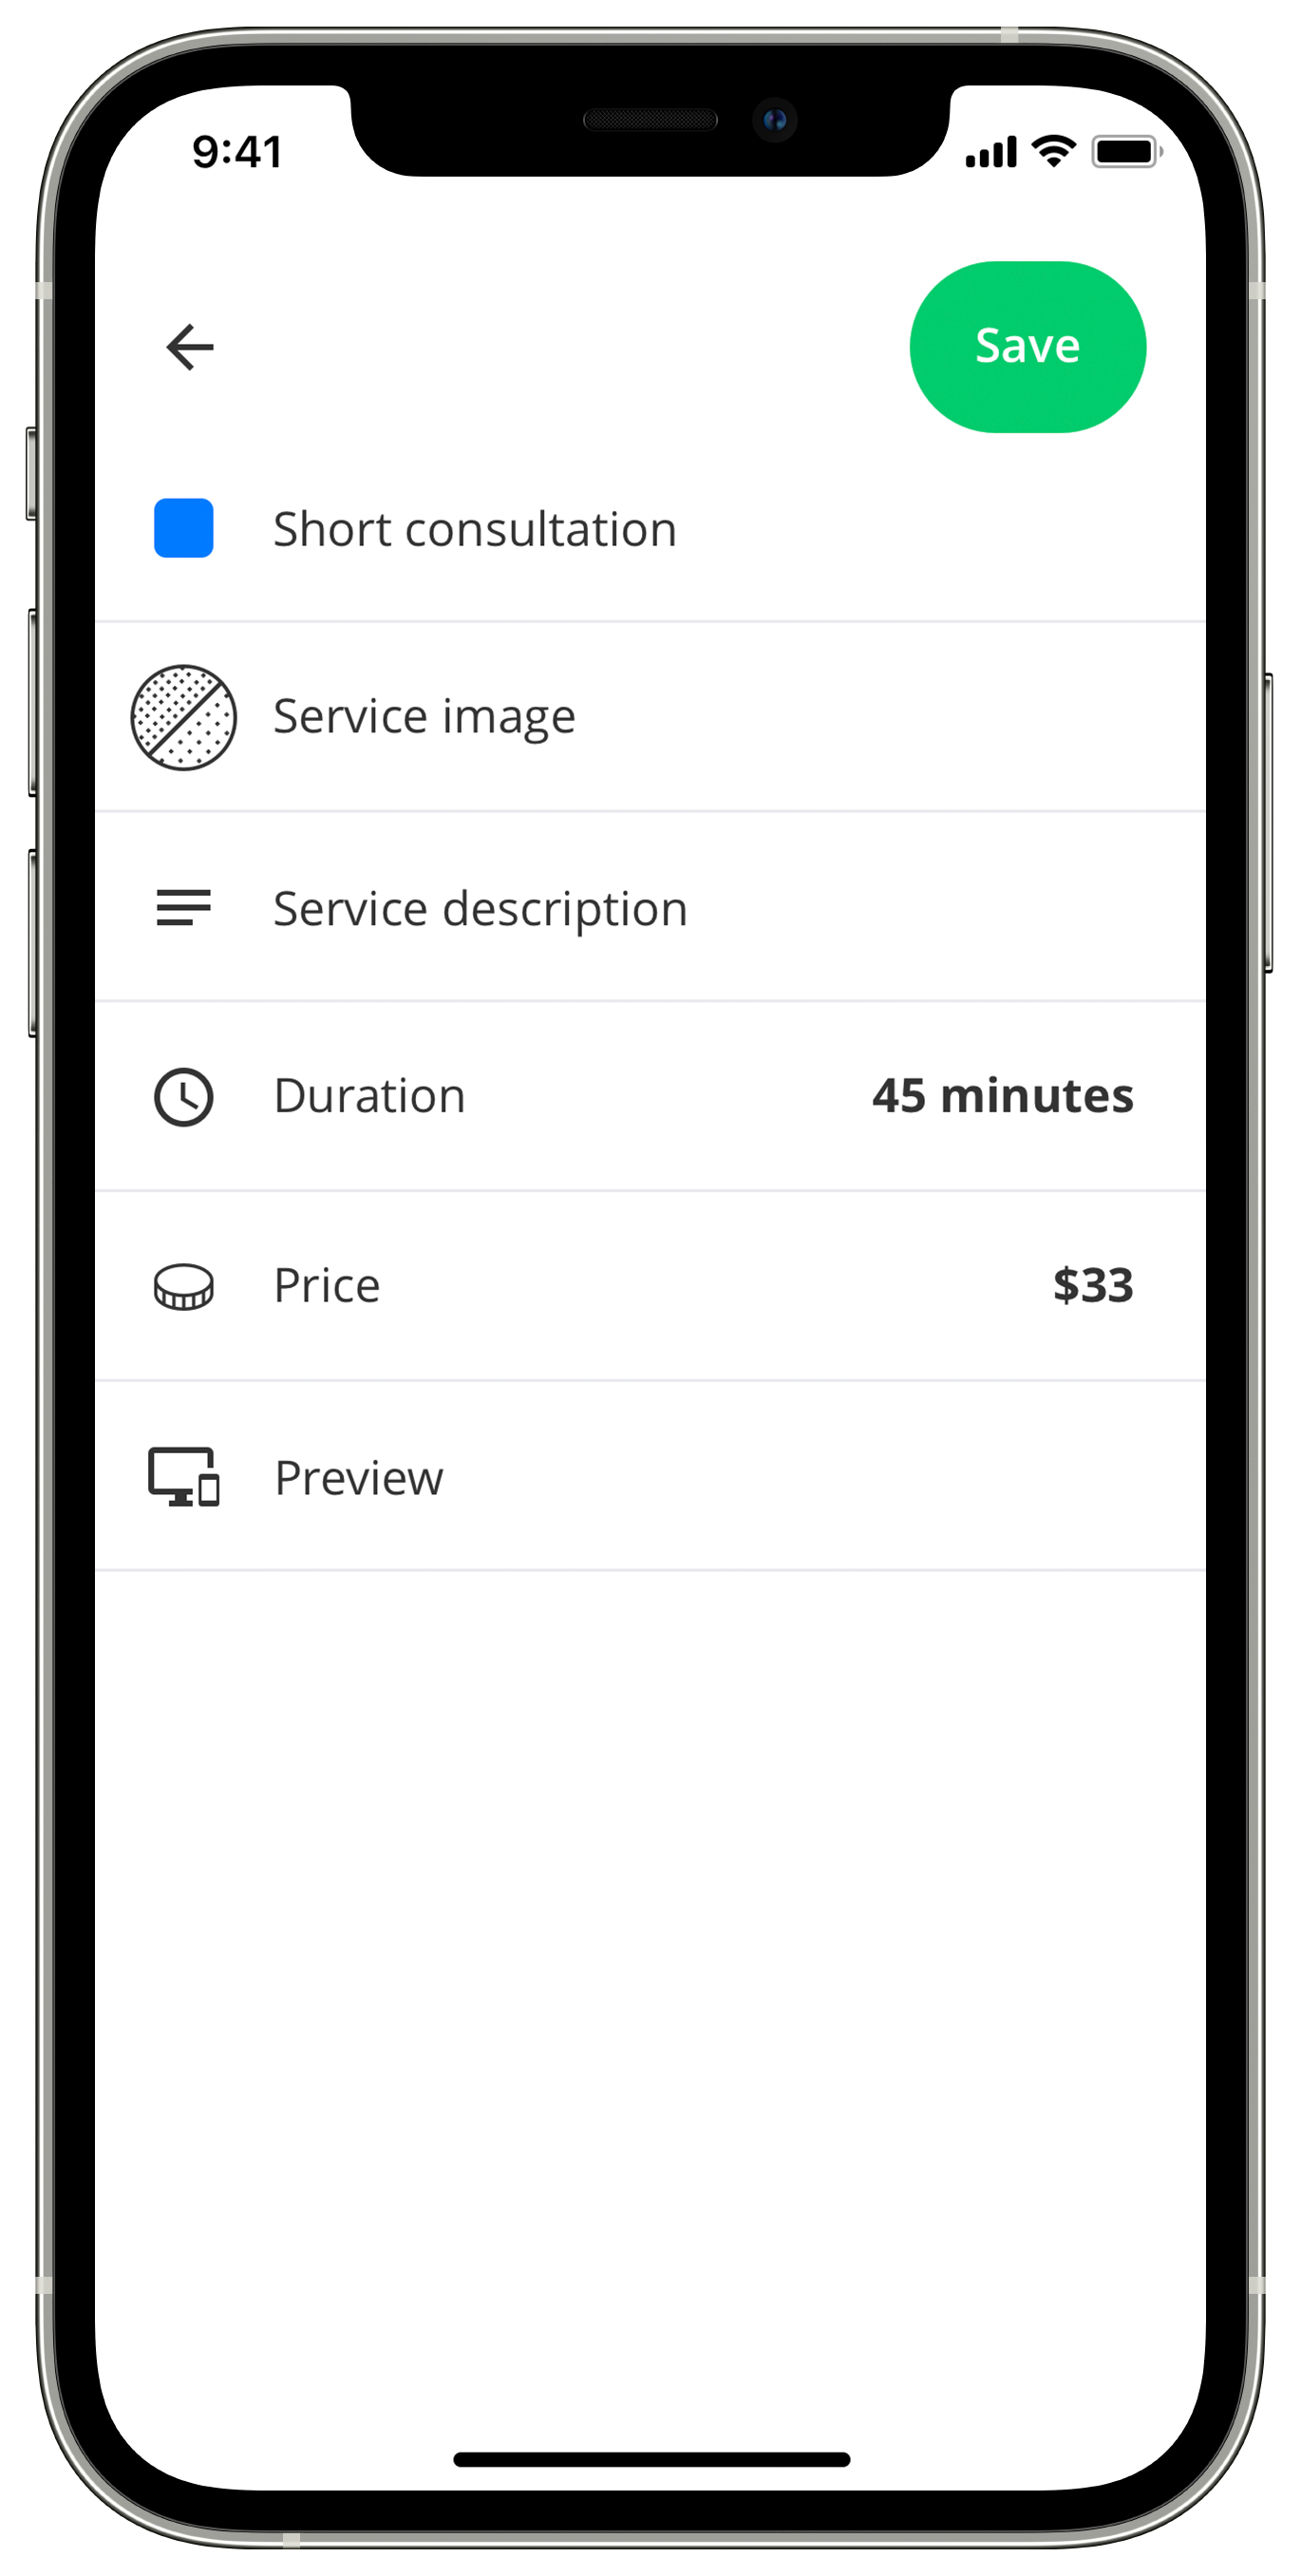
How to add a new service to your custom availability?
Got a new service to offer your clients? Great!
This is how to add your new service:
- Go to the main menu (3 stacked lines).
- Choose ‘Settings’.
- Choose ‘Service types”.
- Click the + button – ‘Add service,’ fill in the details, and click ‘Create.’
How to add an appointment scheduled with a client to the calendar?
While Plannie makes it easy for clients to self-schedule online, some clients may still prefer to coordinate their appointment with you – over a text message or the phone. That’s fine! You can manually add the appointment as follows:
- Click the relevant day in the calendar.
- Click the available time slot.
- Click ‘Book with client’ and select client from the list.
- Unlisted client? Simply click the blue plus sign to add.
How to reschedule or edit an appointment?
To reschedule or edit a booked appointment, do the following:
- Go to your calendar.
- Click and hold the appointment.
- Drag it to the desired time and release.
- Once the appointment is rescheduled, the client will receive a text notification with the new information.
To edit a meeting, tap it to get to the meeting screen. From there you can change time and date, calendar, service type, client details, add notes, or cancel the appointment entirely.
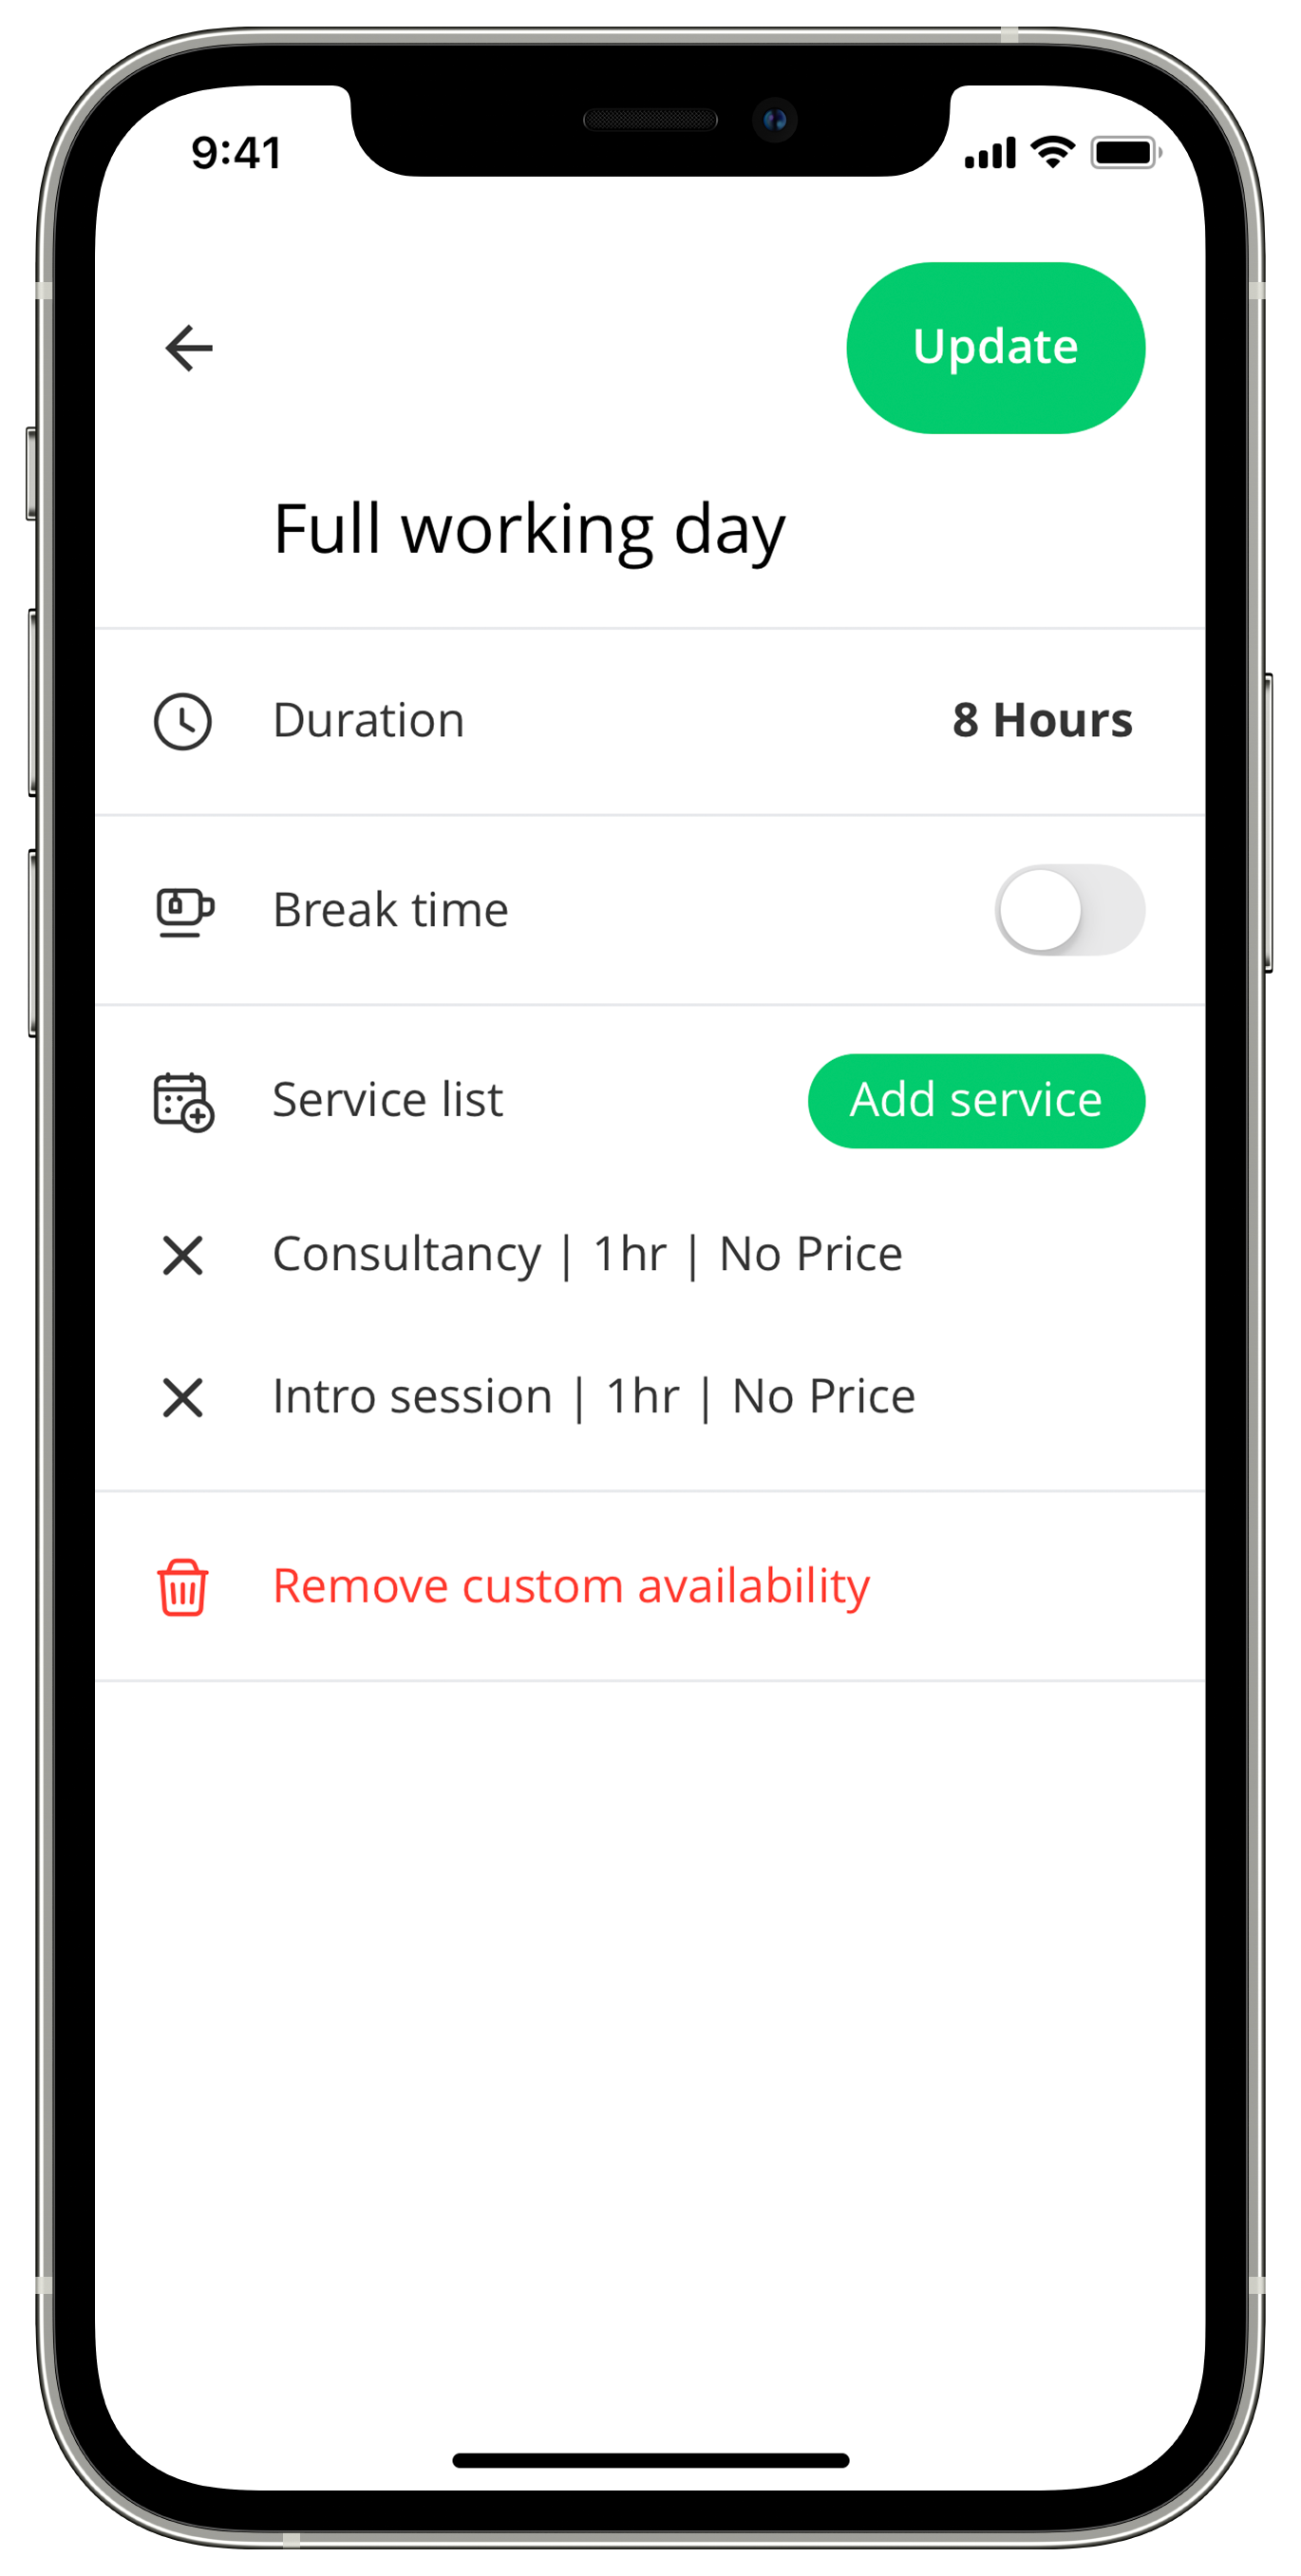
How to edit a custom availability?
To reschedule a booked appointment, follow these steps:
- Go to your calendar.
- Click the custom availability label you would like to edit.
- You can edit it’s name, duration, add or remove break times, select services or remove completely.
- Once done with changes, click the green Update button.
Once the appointment is rescheduled, the client will automatically receive a text notification with the new information.
How to change the custom availability duration?
To change the duration of your custom availability:
- Go to your calendar.
- Click and hold the custom availability label.
- Slide the white pointer that appears at the bottom of the screen to the desired time.
- Alternatively, double click on the desired date , click the 3 dots on the top right and select edit to change times and other attributes
How to sync an external calendar with Plannie?
Plannie syncs with all calendars: Outlook, Google Calendar, Yahoo mail and more…
- Open the main menu (3 stacked lines).
- Choose ‘Settings’.
- Choose ‘Sync external calendars.’
- Activate the ‘Display appointments from external calendars.’
- Select the calendar you want to sync.
Managing multiple calendars
Do you manage several calendars? Can you serve multiple clients simultaneously? Create additional calendars according to your business needs.
How to add a calendar?
- Open the main menu (3 stacked lines).
- Choose ‘Manage calendars.’
- Click ‘+’.
- Select ‘Add calendar.’
- Click ‘Calendar label’ and enter a clear identifying name.
- If you want to set a separate calendar owner, enter the owner’s email – the owner will be free to manage this calendar independently.
- Click ‘Create calendar.’
How to move an appointment from one calendar to another?
- Open the main menu (3 stacked lines).
- Click ‘Manage calendars.’
- Scroll horizontally until you arrive at the desired date.
- Click and hold the appointment, and then drag it to the right calendar.
Still have a question?
We’re happy to help!
We promise a human will get back to you very quickly.